WooCommerce inventory management is a crucial process often overlooked by many store owners worldwide. Without proper inventory management, a WooCommerce store might encounter problems related to stocks, profitability, and long-term growth.
If you want to grow your WooCommerce store significantly over the years, you must commit to a dedicated inventory management process. At first, you might feel overwhelmed with the workings of WooCommerce inventory management. However, you can always use different tools and plugins to ease the process.
WooCommerce Inventory – An Overview
WooCommerce Inventory pertains to the collective space where product stocks are tracked consistently. Whenever an order is successfully shipped, WooCommerce reflects the change automatically. You can then view the recent orders through various filterable reports.
Analyzing inventory reports is crucial for setting the direction of your store. The reports will help you avoid over-ordering stocks. Conversely, reports will also help you avoid shortages because you can anticipate which products have great demand.
WooCommerce Inventory is also flexible enough to work with different plugins. Some plugins like Order Barcodes and Reserved Stock Pro will help you manage your WooCommerce inventory properly.
Advantages of Understanding WooCommerce Inventory
Understanding WooCommerce inventory is essential for your store’s growth. If you know the building blocks of your store’s inventory, you can develop important stock management strategies and even marketing efforts.
Here are the advantages of understanding your WooCommerce inventory:
1. Better Stock Accounting – A dedicated inventory management process will help you see the current amount of stocks in your store. This way, you can avoid running out of stocks or even over-stocking.
2. Improved Sales – Through accurate inventory management, you can prioritize the best products in your store. Over time, your store’s sales will increase because customers can avail the products they truly need or want.
3. Improved Customer Experience – A well-managed WooCommerce inventory can improve customer experience because there are almost no delays or setbacks with orders. Customers can shop freely without worrying about understocked products.
What is WooCommerce Stock Management?
Basically, WooCommerce stock management is the process of maintaining or analyzing a store’s inventory. The process is similar to real store paperwork, except that the latter is more prone to errors and miscalculations.
Managing your store’ stocks through a WooCommerce plugin is highly advised. This way, the process becomes automatic and nearly error-free. You just need to provide the necessary details, and the installed WooCommerce plugin will do the rest.
WooCommerce Inventory Configuration
Under WooCommerce’s Global Settings, you can access different options. Specifically, you can go to WooCommerce > Settings > Products.
Manage Stock
Simply tick the checkbox if you want WooCommerce to manage stocks automatically. This way, WooCommerce will decrease the available stock whenever someone orders a product.
Hold Stock
The second option is Hold Stock. This option is all about orders that have been made but still unpaid. Usually, this situation happens when a customer goes through the checkout process without paying for the product.
Hold Stock allows you to set the time left for customers before the order is automatically cancelled. The default value is 60 minutes, but this can be adjusted according to your specifications and store strategy.
If you want a system where product stocks are reduced whenever they’re added to customer carts, you can check out Puri’s Reserved Stock Pro.
Notifications
Notifications refer to the email updates that you’ll receive about low-stock products or out-of-stock products. Activating notifications is great if you’re keen on analyzing when to order new stocks for your store. You can also add or remove any recipients of notification emails.
Low Stock Threshold
The Low Stock Threshold is a system that checks if specific items are low in stock or not. You can freely decide what constitutes a low stock for your store (i.e. 5, 20, or 100). This setting depends on how fast your store stocks move.
Out of Stock Threshold
This threshold specifies the number of products that will be considered as out-of-stock. Generally you’d set this to 0, unless you also have a physical store and you always want to have a couple of extra items on hand.
Out of Stock Visibility
Once this option is toggled, items that are currently out-of-stock won’t display in your online store. However, we strongly advise to leave all products visible. If customers are looking for a product and can’t find it, they might feel frustrated.
Stock Display Format
You can customize the way remaining products are displayed in your store. The typical formatting styles are 30 in stock and 1 left in stock (for urgency). Alternatively, you can choose to hide the displays altogether.
How to Manage WooCommerce Inventory Using Stock Editor?
Managing WooCommerce inventory is easier to do with the help of a reliable plugin. One plugin that can help you with WooCommerce inventory management is Stock Editor.
The Stock Editor Plugin can help you save time by offering various functions such as product filtering, bulk stock editing, and flexible code integration. Instead of editing variables manually, you can just use Stock Editor to bulk-edit all possible options.

Setting up Stock Editor is easy. You just need to visit Puri.io’s official plugin page and download Stock Editor.
Once you’ve installed the plugin, you can now view and edit different options like product SKUs, product IDs, stock statuses, and stock texts.

Another useful feature of Stock Editor is the filterable search bar. This search bar will let you search any product based on some variables like product name, stock status, and SKU. Using Stock Editor’s search bar is ten times better than trying to find a product manually.
Additionally, Stock Editor’s filterable search bar allows bulk-searching for greater convenience. Just click the status dropdown and the search bar will display any products tagged with the selected status.
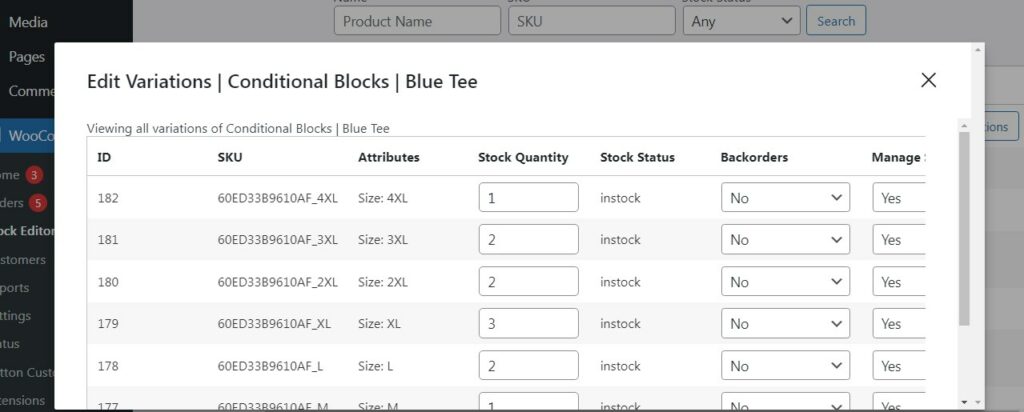
Stock Editor’s variation-editing function is also in-depth yet easy to understand. With Stock Editor, you can edit different stock variations like quantities, parent products, and backorder notifications.
You can even create a list of product variations in a quick order form. By doing so, you can see accurate information about all product variations through a convenient table display. To make this possible, you may need to install the WooCommerce Product Table plugin.
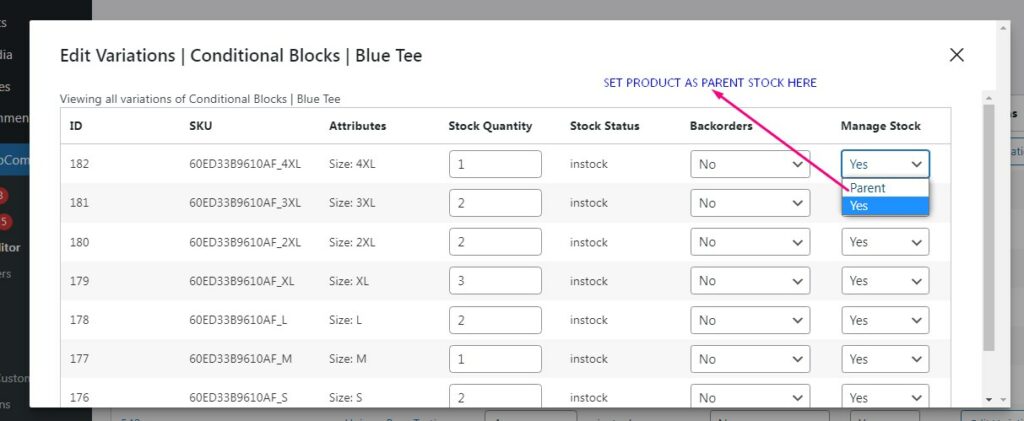
Now, let’s discuss Stock Editor’s parent product designation. If a product is set as a parent stock it will be used up instead of the variations.
Example: Your product has a stock of 5 units with multiple variations set as A, B, and C. If any of the variations are sold and they’re set as parents, they will trigger the main product stock to go down.
Conversely, if a product is not set as parent (Manage Stock: Yes), it might have different variations. These variations will go down once they are sold, instead of the parent stock.
Example: Your product has a stock of 5 units with multiple variations A, B, and C not set to parent. These variations will show their current stock counts, and the parent product won’t have any stock at all.
How Does WooCommerce Handle Stock?
WooCommerce handles store stock in a meticulous way. Basically, each product has its own stock level that can be edited from the product overview screen.
It’s also important to note that each product variation can have a stock level that’s independent from the parent product. The variation stock can be managed from the Variations tab under the parent product edit screen.
Editing Product Variations Manually
If you don’t want to use a plugin like Stock Editor for editing product variations, you can always do the process manually. Editing variations manually is slower than using a dedicated plugin.
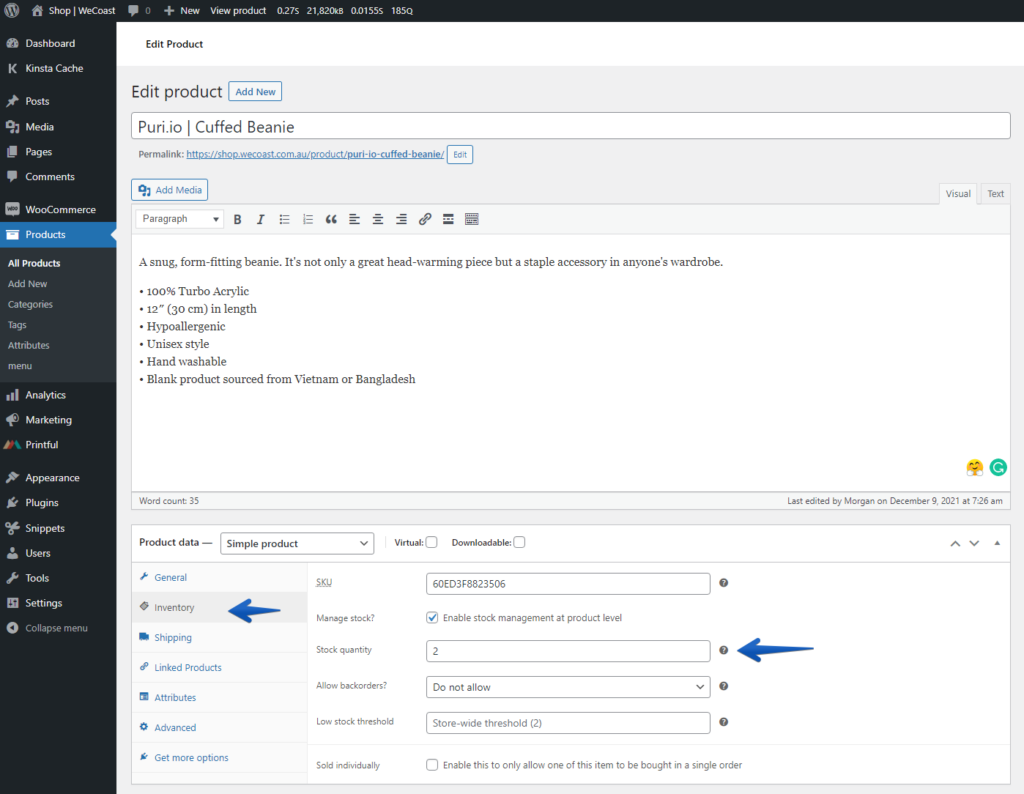
In the product edit page, simply choose a product and click the Edit button. This page will allow you to edit the details of your product such as descriptions, names, and general formatting.
If you want to update the product stock, simply click the Inventory button from the product edit page. Under the Inventory section, you can edit stock quantity, toggle backorders, and adjust the stock threshold. You can also change the product SKU and toggle the Manage Stock (stock management on product level) option.
We’ve written a full developer guide on how to update stocks programmatically. It’s a similar code technique to our Stock Editor plugin for WooCommerce.
Editing Variable Products
Variable products are also known as ‘parent products.’ It’s typical for a variable product to have different variations like sizes, colors, and other attributes.
Keep in mind that if the Manage Stock option isn’t enabled and the parent product has a stock level, each new order will reduce the stock count of the parent.
However, if Manage Stock is enabled, each new order will just reduce the product variation’s stock.
You can freely edit each stock variation according to your desired preferences. But without Stock Editor’s bulk-editing function, the process will take a long time!
How Can Plugins Help Inventory Management?
Now that you’re aware of the inventory management capabilities of WooCommerce, let’s explore the real deal about plugins. Knowing how plugins help inventory management will allow you to pick the best option for your store.
These are the ways plugins help inventory management:
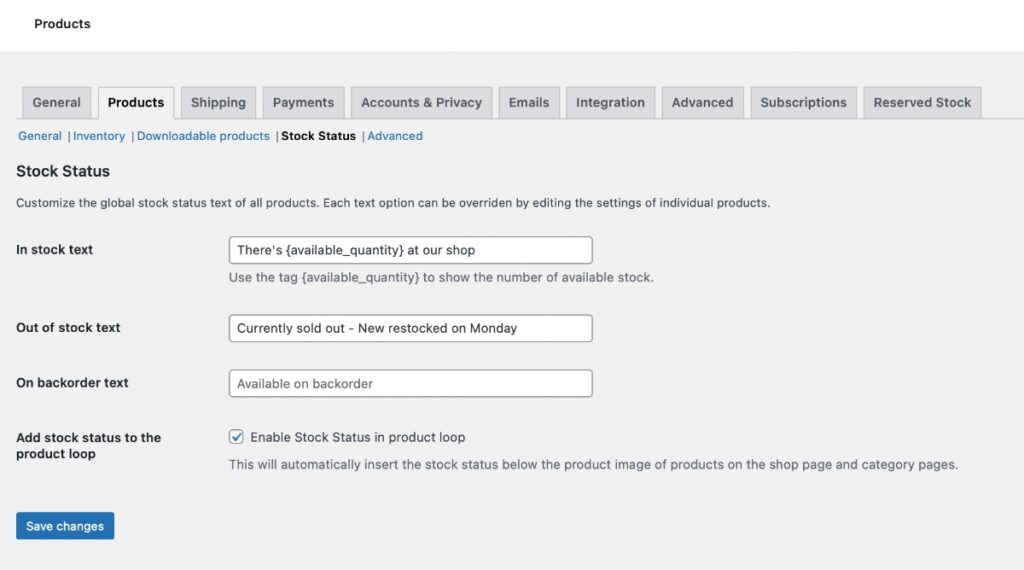
Providing Stock Status Information
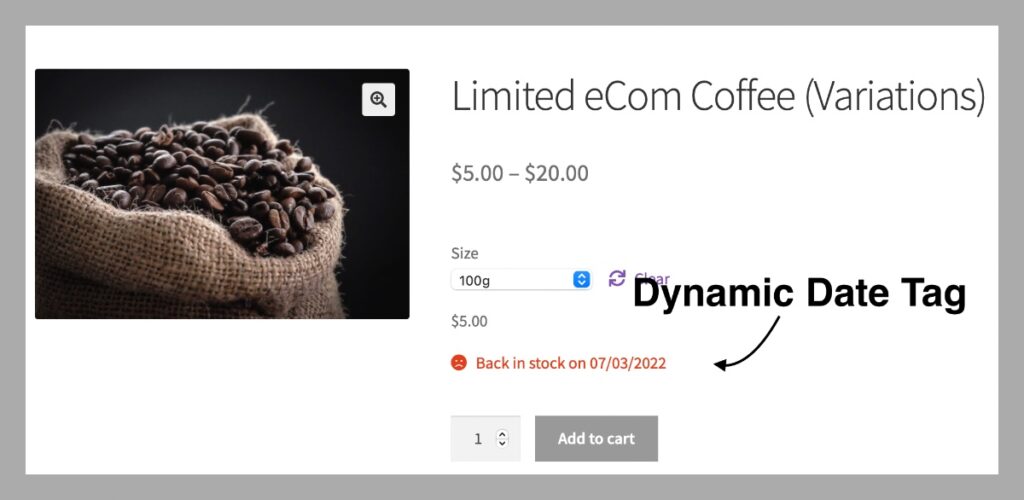
Has your store product ran out? Well, don’t miss the chance to tell your customers when the next product stock will arrive!
Stock status messages are highly customizable, and they are also useful for all customers. If customers know when the next product arrival is, they can plan their budgets ahead and make the purchase. This is great for improving long-term shopping satisfaction.
The Stock Status plugin is a simple yet exceptional option that will let you set custom stock messages. Additionally, the plugin will let you add a dynamic date tag that will set a product’s availability.
Speed Up Inventory Updates
Updating your store inventory manually can be time consuming, especially if your store has many products. While editing inventory can’t be avoided, you always have the option to speed up the process by using a reliable plugin.
Stock Editor is an excellent plugin choice because it allows in-depth bulk editing of all products in your store. Say goodbye to manual inventory editing!
Set Viable Product Quantity Limits
If you think that your store’s product quantity limit is not optimal, you can use a plugin that allows quantity adjustment. One plugin example is Puri’s Min & Max Quantities. This plugin allows you to set minimum and maximum product orders, which is great for exclusive or limited-edition paired products.
Puri’s Stock Quantity Multiplier is another great option if your store is selling products by bulk. This plugin allows you to set a multiplier for every product and product variation. For example, you can sell one product and subtract five from your inventory. Managing fast bulk orders has never been this easier!
Reserve Products in Cart
Having negative stock is one of the common problems of WooCommerce stores. The problem is even more prevalent during rush sales or holiday events. Negative stock occurs whenever many people have ordered products yet there are only a few stocks available. This situation results into simultaneous ‘out of stock’ messages, order failures, and a drop in customer satisfaction.
One plugin that can solve the negative stock problem is Reserved Stock Pro. Basically, Reserved Stock Pro (RSP) will allow customers to reserve the orders in their carts for a limited time period. Customers will receive important information on the frontend about reservations, as well as a dynamic order countdown.
Certainly! Here are a few more limitations of WooCommerce’s stock and quantity features that you can include in your post:
Limitations of WooCommerce Stock and Quantity Features
While WooCommerce offers powerful stock and quantity management capabilities, it’s important to be aware of certain limitations. Understanding these limitations will help you make informed decisions and optimize your inventory management process. Here are some key limitations to consider:
- Whole Number Restriction: By default, WooCommerce’s stock and quantity features only support whole numbers. This means that if you need to manage decimal quantities, such as selling products by weight or in fractional units, you may encounter challenges. It’s crucial to choose a reliable plugin, like StudioWombat‘s article on WooCommerce quantity input customization, which provides insights and recommendations for managing decimal quantities effectively.
- Limited Stock Precision: WooCommerce’s stock management system uses an integer-based approach, which can result in limited precision when dealing with large quantities or small increments. For businesses that rely on precise inventory tracking, such as those in the manufacturing or pharmaceutical industries, this limitation may require additional customization or the use of specialized plugins.
- Manual Stock Updates: By default, WooCommerce requires manual updates of stock levels when new orders are placed or when stock is replenished. This can be time-consuming and prone to human error, especially for stores with a high volume of sales. Consider implementing automated stock management solutions or integrations with inventory management systems to streamline this process.
- Lack of Real-time Stock Syncing: WooCommerce’s stock management system does not provide real-time syncing capabilities with external platforms or marketplaces. If you sell your products on multiple channels or have a brick-and-mortar store, it’s essential to implement integrations or plugins that can synchronize stock levels across all platforms to avoid overselling or stockouts.
- Limited Stock Notifications: While WooCommerce does offer stock notification emails for low stock or out-of-stock products, the default notification system has limited customization options. Consider using plugins or extensions that provide more advanced notification features, such as customizable email templates, real-time alerts, or notifications to specific users or roles within your organization.
By understanding and addressing these limitations, you can optimize your inventory management process and ensure a seamless shopping experience for your customers.
Remember, choosing the right plugins and implementing best practices will help you overcome these limitations and maximize the potential of WooCommerce’s stock and quantity management features.
FAQ
1. What are the best plugins for WooCommerce inventory management?
Answer: Aside from Puri’s Stock Editor, some of the best plugins that you can try are Smart Manager for WooCommerce, WP Inventory Manager, and WooCommerce POS Inventory Count. If you need some plugins that notify customers whenever their favorite products are restocked, you can check out these back-in-stock plugins.
2. How often should I update my WooCommerce inventory?
Answer: It’s beneficial to update your store inventory every day or a few times per week. This will ensure that your stocks are properly managed, preventing overselling and running out of stocks.
3. How many plugins do I need to manage my WooCommerce inventory properly?
Answer: As much as possible, you should only use less than 5 plugins for your store. Having too many plugins can slow down your store, and they might even cause various site-breaking issues.
Conclusion
WooCommerce inventory management is an important process that must be periodically done for your store. The benefits of inventory management far outweigh any hassles or disadvantages. Plus, an efficient and well-managed WooCommerce inventory can be your edge in the fast-paced world of eCommerce!
